Monday, September 13, 2010

Get Inspired 101 "Open House"

******************************************************
   
If you're from the Birmingham area, or might happen to be traveling through on September 23rd and/or the 24th, and you are interested in becoming an Interior Designer, or would just like more information on what an Interior Design career entails .. then you should attend the “Get Inspired 101” Open House Event that we are having at the Southern Institute School of Interior Design @ Virginia College in Birmingham, AL.

******************************************************


******************************************************

There is no admission fee, yes it’s FREE, and we will be providing you with both light refreshments & workshops on:

Portfolio Presentations

During their student career at the Southern Institute School of Interior Design at Virginia College, students produce fine pieces of work that they can include in their student portfolios. During their Senior Year students take these pieces of work and combine them during the Portfolio Presentations class.


A student portfolio consists of: a digital portfolio, a printed portfolio, a leave behind, a business card, and a thank you note. These student portfolio tools are used during interviews and can be given a potential employer during the interview process. These valuable portfolio tools can set you a step above from other potential applicants.

Color Trends & Forecasting
(what in the world is this, you ask?)

Well, long story short, we’re going to show you how to know what’s going to be “hot”, what might be a “not”, and what everyone else has in their homes so that YOU can be the next trendsetter in YOUR neighborhood! From the latest trends to the oldest .. come find out where things stand!


We’re going to show you how to mix some fabrics, put a color scheme together, and how Interior Designers design for the residential field, the healthcare field, hospitality field, and also the corporate field.


Decorating

The Southern Institute School of Interior Design at Virginia College can help you develop, hone, and produce Interior Decorating skills that go above and beyond what you thought you knew about decorating.

Design

One of the most important things about learning about design is learning that it’s not just about decorating and picking colors. Interior Designers wear more than one hat during their careers; they are actually very versatile employees. Interior Designers use many tools in creating their designs. From designing a piece of furniture to picking out the final finishes for a project, Interior Designers follow the design process from start to finish and everything in between.


Technology

There are so many technological tools available to Interior Designers in today’s market. From AutoCAD to Google SketchUp, to Autodesk Homestyler, come let us give you a taste of what the technology world has to offer today’s Interior Designers!


******************************************************
Come join us on either day, tour our brand new Interior Design facility, meet current Interior Design students and faculty, and get registered for awesome door prizes!

******************************************************

 Keep in mind that even if you're still in highschool you're still welcome to attend, and if you've already graduated there will be Career Service Represenatives available before, during, and after the workshops to help you decide if a career in Interior Design is right for you!

Ther is still plenty of time to register for the upcoming 2010 Fall Quarter!!!

******************************************************


Wednesday, August 25, 2010

Please Vote For My Design!

Hi All!!

I'm trying to win the 2010 Autodesk Dorm Room Design Contest .. The contest will be over on September 09, 2010.. so if you would PLEASE, PLEASE, PLEASE go rate my design with 5 stars!

The design with the highest star rating by September 9th will win 1st place and a $500 Target Card!!!
The name of my design is "Jennie's Double Dorm Room".  Right now it's listed under "All Designs" but the more votes I get the more likely it is that my design will end up under the "Featured Designs"" category.

In order to vite you have to create an account BUT you can use your Gmail account, Facebook account, Microsoft Live account, or even your Yahoo mail account to register .. so it's not a lot to fill out at all .. just a few clicks!!!

I really appreciate any help you can give me!!!

Here is the link to the design gallery
http://www.homestyler.com/gallery/all/mostrecent

Thanks in Advance!!!
Jennie

Thursday, July 8, 2010

My Digital Portfolio

Well Portfolio class has come and gone (as well as about $500), and what I've been left with is a Portfolio Package that I am REALLY proud of.  
  
Although I had to work my butt off for 3 months in my Portfolio class, and the times that I went several days at a time without sleep, and the times that I had to put off a lot of social/family activities, and the times that I stayed at the school until they literally had to kick me out, and when I stayed up so many nights that I thought my boyfriend was also going to kick me out (lol), and let's not forget changing the entire look of my portfolio almost halfway through the quarter ... all to make my Portfolio be exactly what I wanted it to be, but personally I think that in the end all the hard work, sacrifices, and effort was well worth it.
  
The entire package consisted of:     

                                                                 •  a business card
                                                                 •  a resume
                                                                 •  a thank you card
                                                                 •  a hyperlinked digital portfolio
                                                                 •  a physical portfolio, and
                                                                 •  a "leave-behind"


Below is a condensed version of my Digital Portfolio.   Unfortunately, due to the original file size being so large, I have yet to be able to locate a hosting site that allows files over 100MB; hopefully I can get the entire Portfolio up and running soon!
  
I hope you enjoy the condensed version for now though.

Thursday, May 27, 2010

"Get Inspired"


So I'm kinda behind on this, but here are the results from our "Get Inspired" event that we had on May 14 & 15th.

The event turned out GREAT!  We had a full house Thursday night (the 14th) and even though not as many people came on Friday (the 15th) there was still a nice group of ladies that RSVP'd.

Mrs. Brooks started the event off with her Color Trend Forecast for 2010, and her Weekend Fix-up ideas.

Everyone loved her re-purposed, found on the road-side, revamped porch furniture .. if you didn't come .. you should have!  Mrs. Brooks is also on Good Day Alabama once a month .. she's always full of great, inspiring ideas!

04/20/10

ROOM MAKEOVER - Catherine Brooks with Virginia College joins us with some ideas to makeover your room in one weekend! She shows us some pictures of before and after rooms, a few accessories to make a big impact, and more! She shows us how removing wall paper or using a bit of paint can make a big difference.
05/18/10
INTERIOR DESIGN FOR YOUR PORCH - Catherine Brooks - Interior Design Instructor at Virginia College - showed us some ideas for decorating your outdoor spaces! She showed us how a bit of paint, pillow slip covers, and inexpensive plates and lanterns can make a major difference. She says you don't have to spend lots of money to make it look nice and inviting!

After Mrs. Brooks got the groups juices flowing .. we decided to get their taste buds popping .. by offering them a variety of yummy treats ...

After everyone finished piled up their plates with goodies, we escorted the ladies down to Rachel Eden's Non-Junk Janking .. Junk'o'Ramaville .. where she had a great assortment of her "junk-art" pieces lined up and ready to go .. so that everyone could see just how that everyday junk, that most people just throw away (and that Rachael reclaims), can be turned into one-of-a-kind, awesome treasures!


From the chalkboard windows ... to the cork board shutters ... to the leftover crown molding adorned mirrors & picture frames .. Rachael had them oooing and ahhhhing after every new (or should I say old) thing she showed them.


Not only did Rachael share her most favorite places to go "junkin" with the group .. which, if you're into re-purposing you'll be sorry you missed out on that info! ... but she also introduced *our blogs to the group as well ..
http://www.urbanedenal.blogspot.com/ 
http://www.salvageinthecity.blogspot.com/ , and http://www.designologybyjennie.blogspot.com/

.. needless to say I certainly appreciated the exposure!  Thanks Rachael!

After Rachael's session we gave the group a short recess, so they could stretch their legs, grab some more goodies, and then head on over to the "Shop" that we had set up in the Materials & Finishes Lab (thanks to Karen for volunteering to do that, and also for putting up with my highly caffinated self trying to "help" her lol).

We had several items left over from the 2010 Decorator's Show House that we offered up to the group .. at discounted rates!  (Thanks to Stefanie & Owen for manning the "shop" for us! 

We also still have a few items left, watch this blog for those to show up
(with prices) very soon!


To conclude our "Get Inspired" event we had Mrs. Melissa Sypeck give the group some valuable tips on accessorizing their homes & also how to stage a home for re-sale. 

Many people cannot nab buyers simply because the buyers can't imagine themselves in a house with lime green walls in the living room.  Sure, those lime green walls looked great with your furniture and accessories .. but when those things are all in storage .. and all the buyer see is GREEN .. Houston .. we have a problem! 


Mrs. Sypeck gave the group some quick fixes for just such problems .. so that you can get your house off the market, and get yourself into that new space you crave!


If you wanted to come to this event, but didn't get to .. or didn't know about it until just now .. don't fret!  We plan to have other events very similar (of course they will be on different topics, sorry) in the very near future .. so if you'd like to get on the mailing list, so that we can alert you about up coming events,  just e-mail us!


We'd love to see you ALL at our next event!!


Monday, May 10, 2010

Ring Around the Rosey ... Buckets ... Full of Posies?

I came across this recipe for the cutest Flower Cupcakes at the grocery store.  I saw the book in the checkout line and begged my boyfriend to buy it; being the great guy he is .. he of course bought it.

I had no idea why I wanted it so badly, but I did.  I carried the book around in my purse for about 3 weeks, wondering when I could make these fabulous little flowers, and then the idea came to me .. these would make a great Mother's Day gift!

The recipe is pretty simplistic, to be honest.

Non-Food Items Required:
           
Mini-Muffin Pan (a 24 works best)
Some sort of Tin/plastic/glass Pail, Terra Cotta Pot, ect.
Green Floral Sticks
Baking Cups
Colored Tissue Paper (I chose green)
Floral Foam
Scissors/Sharp Knife
Yellow & Green Food Coloring
#18 Piping Tip
A Coupler
12" Disposable Decorating Bags
A Tall glass (I use a beer glass)
Rolling Pin
1 Gallon Ziplock Bag
Leaf Candy Mold (silicone works best)
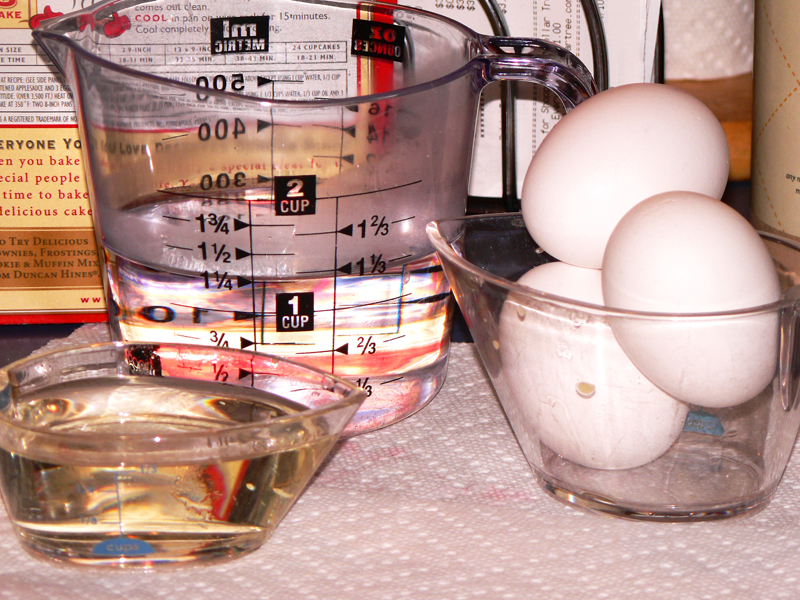
2 Cup Measuring Cup
1 Cup Measuring Cup
Mixer (you could do it by hand, but your arm is gonna be worn out lol)
Several Large Bowls

Food Items Needed:
         
1 Box of Yellow cake mix (I used Betty Crocker)
Water2 16oz Cans of White Frosting (again, Betty Crocker .. Rich & Creamy)
Eggs
Vegetable Oil (unless you use Applesauce to make the cupcakes less-fatty)
2 Boxes Confectioners Sugar
Gummy Raspberries & Blackberries
Peppermint Flavoring (recipe called for spearmint, but I don't like spearmint)
Granulated Sugar
1 Pack of Oreo Cookies
Cream Cheese

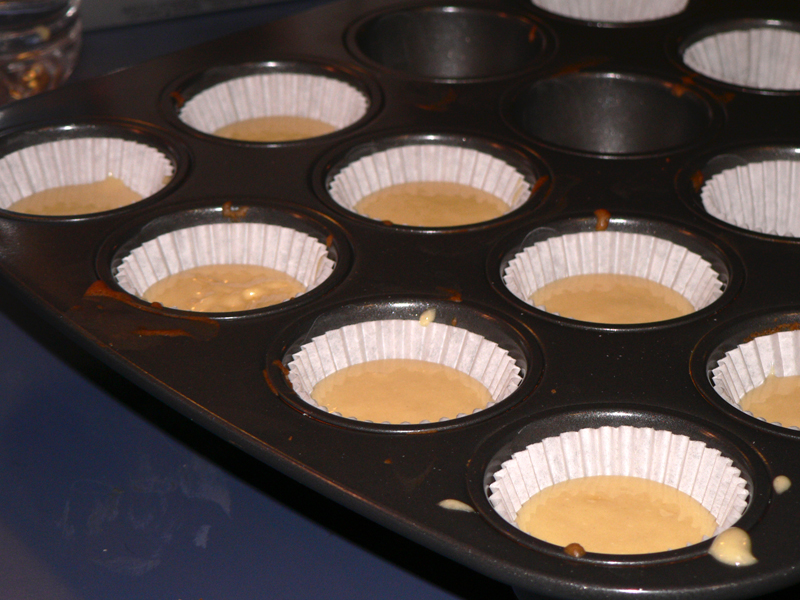
Once you get the batter mixed up, and you've got the baking cups loaded into your mini-muffin pan, fill each baking cup around 3/4 full.


Once your cupcakes are finished baking, let them cool in the pan for about 5 minutes, then unload your pan and put the muffins on a rack to cool for about 30-45 minutes. 

Now go load than pan back up .. cake batter doesn't need to sit around for long .. so you need to work as quickly as you can! 


While the cupcakes are cooking/cooling you can make the leaf mints.  These are pretty easy to make as well, but you'll have to buy a candy mold (like $4 at the wonderful Lobby of Hobby).  


The mints I made only have 5 ingredients:  
  • 2 1/2 cups of Confectioners Sugar (sifted and declumped)
  • 3 oz of Cream Cheese (pre-softened to room temperature)
  • Peppermint Flavoring (I used 1/4 of the bottle, but I like them strong)
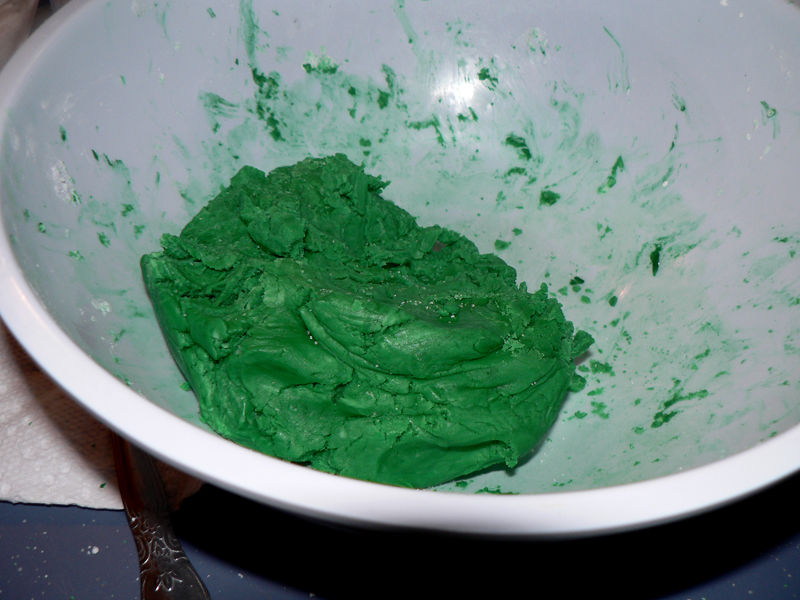
  • Green Food Coloring (again, I used 1/4 of the bottle, I wanted them dark)
  • Granulated Sugar (for mold release)


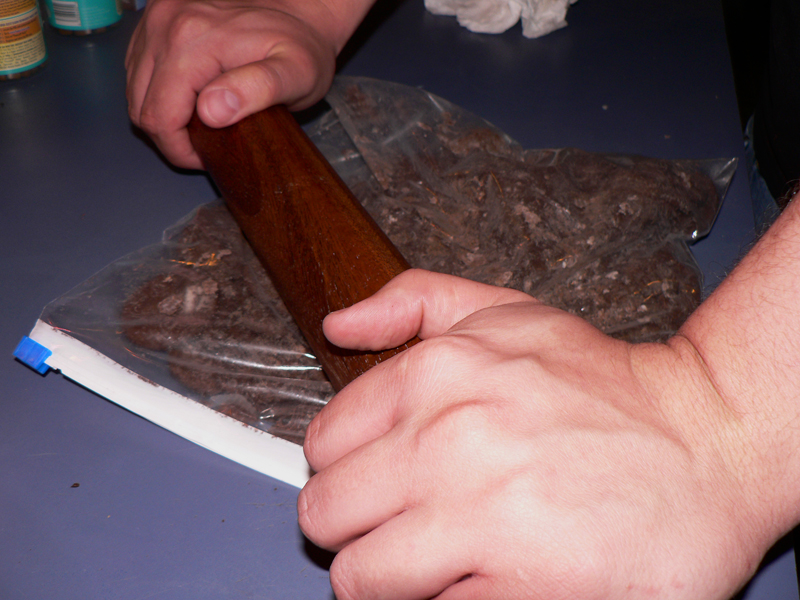
Once you mix all the ingredients together you'll need to knead the "dough" until the color is evenly distributed.  (and I suggest wearing gloves, unless you want Incredible Hulk hands for the next month lol)

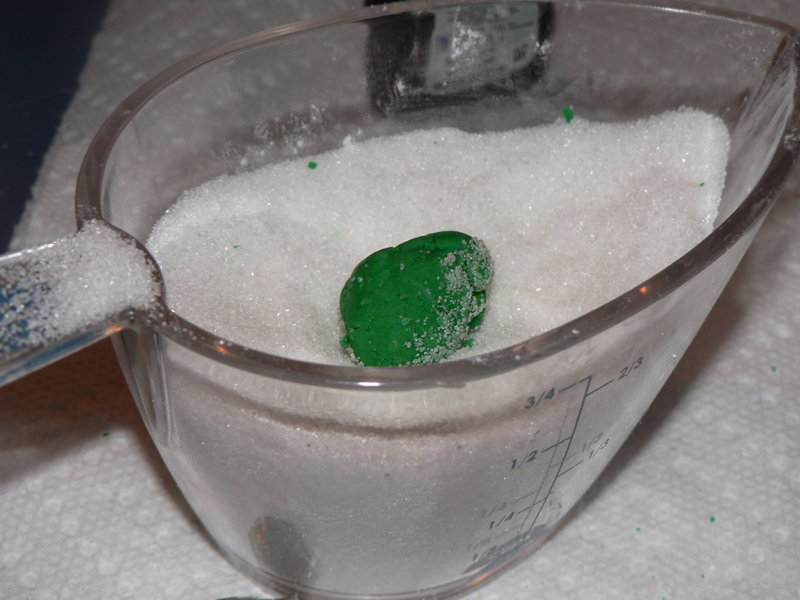
Once the color is evenly distributed, you'll need to shape it up, using the molds.  There is NO BAKING involved in these mints; which is why I love them so much lol.  You just simply pinch off a small piece of the dough, roll it into a ball, then roll it in the Granulated Sugar (this helps the dough release from the molds, plus it makes the leaves kinda sparkley lol).
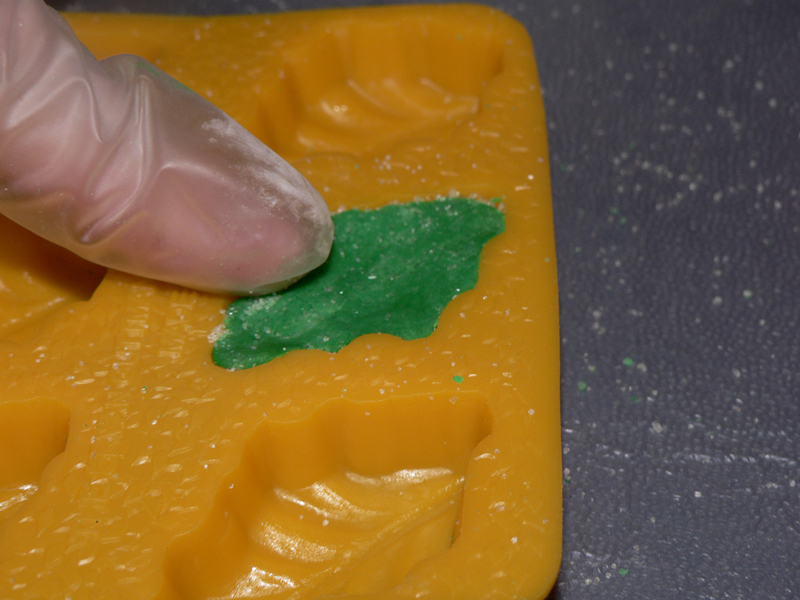
Only pinch off a small portion of dough.  Press the dough into the molds firmly; this sets a good impression that wont distort when you release the mints from the molds.  Once you have your mold loaded, flip it over and pull the edge up while pressing the bottom of the mold, to pop the mints out.  Refrigerate them immediantly.


By the time you finish all your mints your last batch of cupcakes should be cooling, so you've still got a little time to kill.  Now we need to make the dirt for our flower pots!

Get out your Rolling Pin, a Pack of Oreo Cookies, and a large Ziplock Baggie (I prefer the zipper kind).

You'll want to remove the white filling first .. then put the cookies into the Ziplock Bag, press the air out, zip it up, and start smashing them into oblivion!

Warning: Don't be tempted into eating all that white filling .. you'll regret it later LOL.


Ok, so by now your cupcakes should be sufficiently cooled & it's time to get to the really fun part .. the decorating!


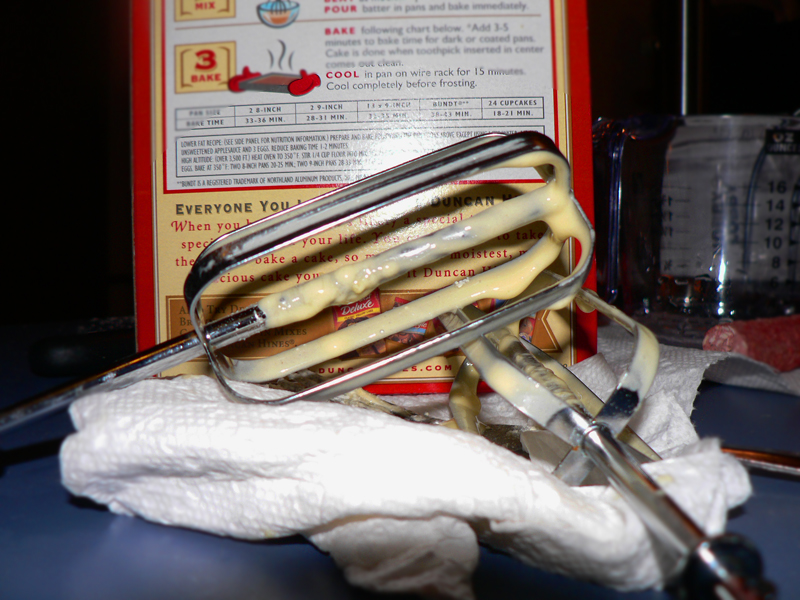
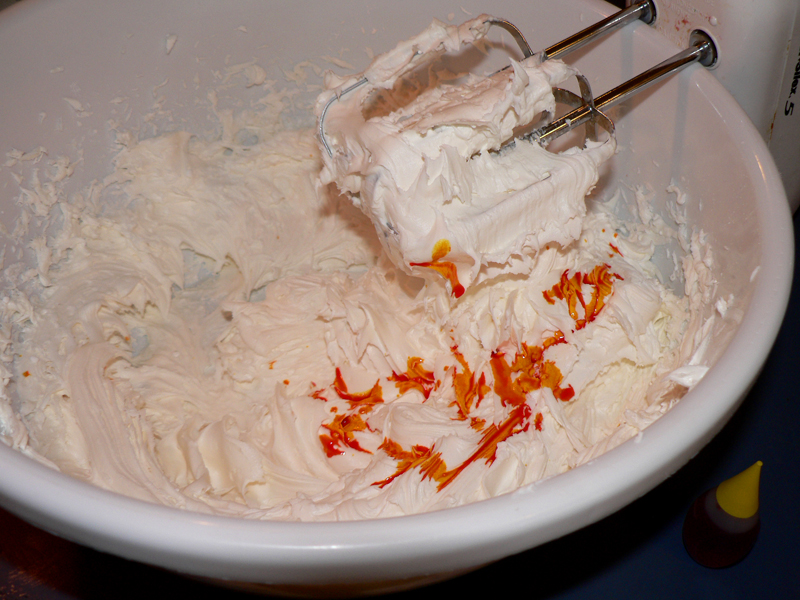
 First you've gotta turn that white icing yellow!  So spoon the icing into a large bowl, squirt in a good amount of yellow food coloring (the paste works best, but I didn't have any .. so liquid it was lol).

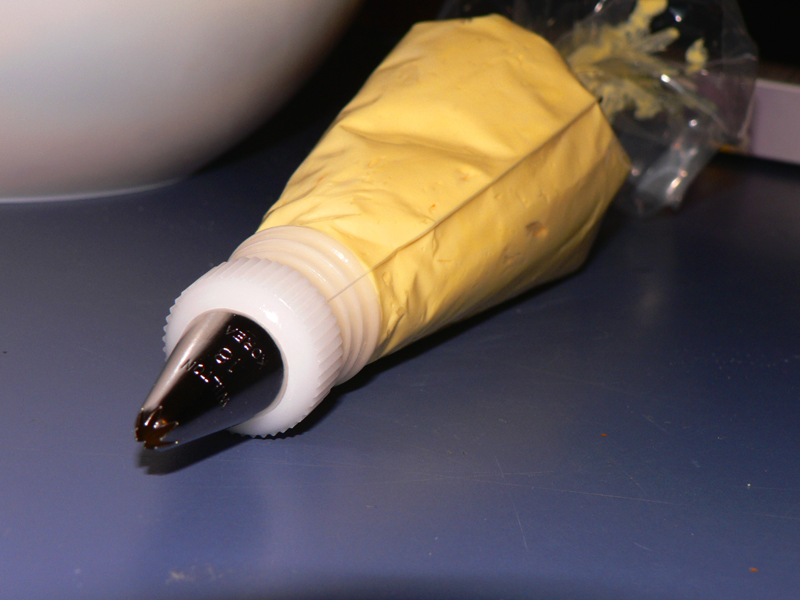
Note: don't use too much, or it will thin out your icing


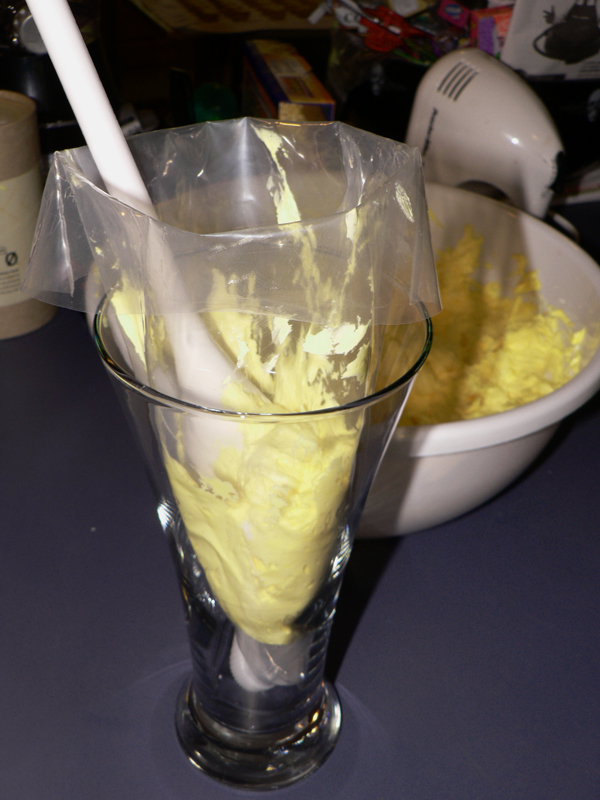
 The first thing I usually do is find a tall glass.  This will help you out tremendously when filling up your piping bag. 

The second thing I do is fold the end over, like a sleeve.  Then I use the back of a spoon to fill 1/2 the bag up .. pressing as much icing to the front of the bag as possible.


The third thing I do is "burp" the bag.  This releases air bubbles trapped under the icing inside the bag. 


If you don't burp it, you may get a suprise later on while you are decorating .. a nice big blow-out!  I twist my bag up and pipe out a little to make sure I have all the air out of the tip.


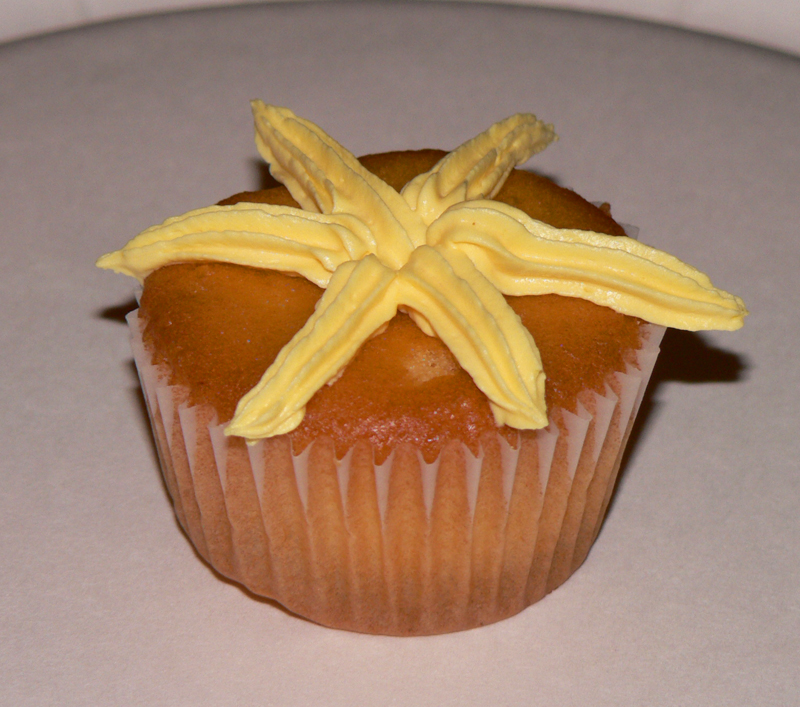
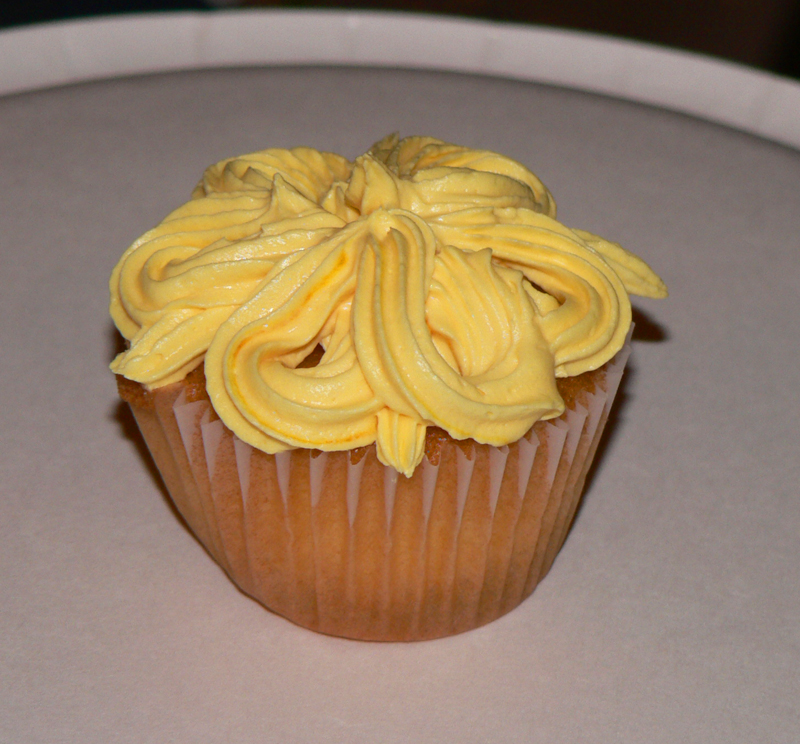
 You start by making a 6 legged spoke design (pretty much an star with a tail lol).  You want to start in the middle and pull outwards, leaving a small tail hanging over the edge of the cupcake. 


Next you want to make a loop between each spoke.  Again, starting in the middle, and doubling back.  You want this to be on top of the spokes though, and you should end up with 6 loops.

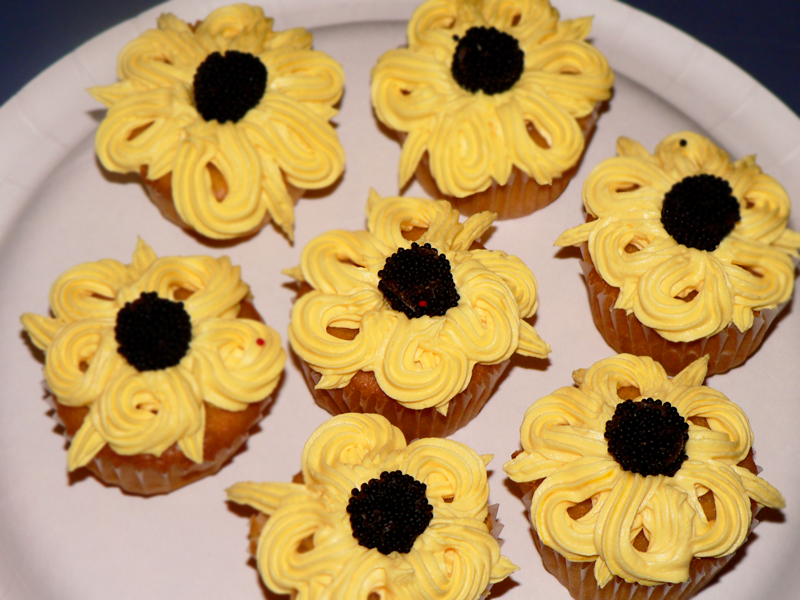
Once you've got all the petals on your flower you need a center.


Most flowers have a grainy looking center, and these flowers are no different (the recipe said that they were Sunflowers but I decided I thought they looked more like Black-eyed Susans). 

The best thing for the job are the Gummy Raspberries & Blackberries by Jelly Bellies (all Cracker Barrels have them & so does Target). 

Note: The ones at Walmart aren't the same, size-wise or taste-wise.


Once you've picked all the red ones out from the black ones (they are so yummy, aren't they?) Just plunk one down, upside down, in the center of your cupcake .. and you've got yourself one pretty, little flower!

Just do this 6 more times to complete 1 Bouquet!


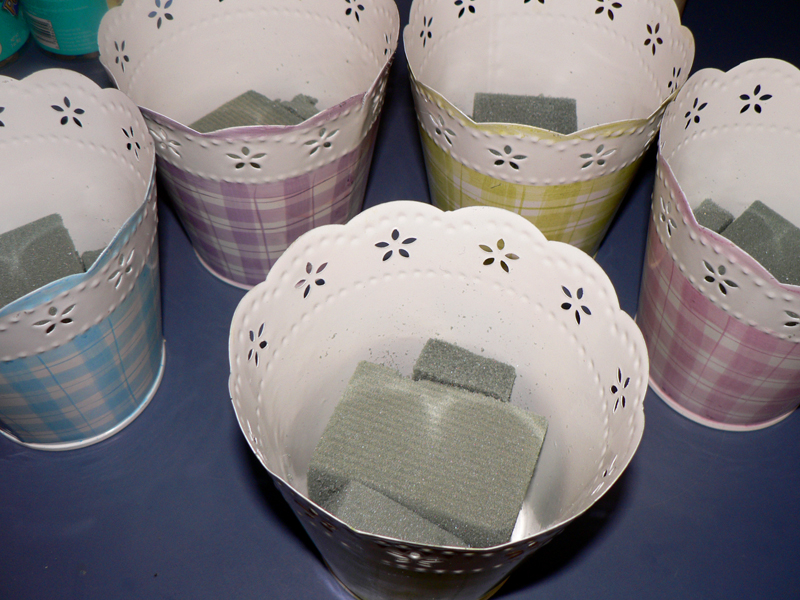
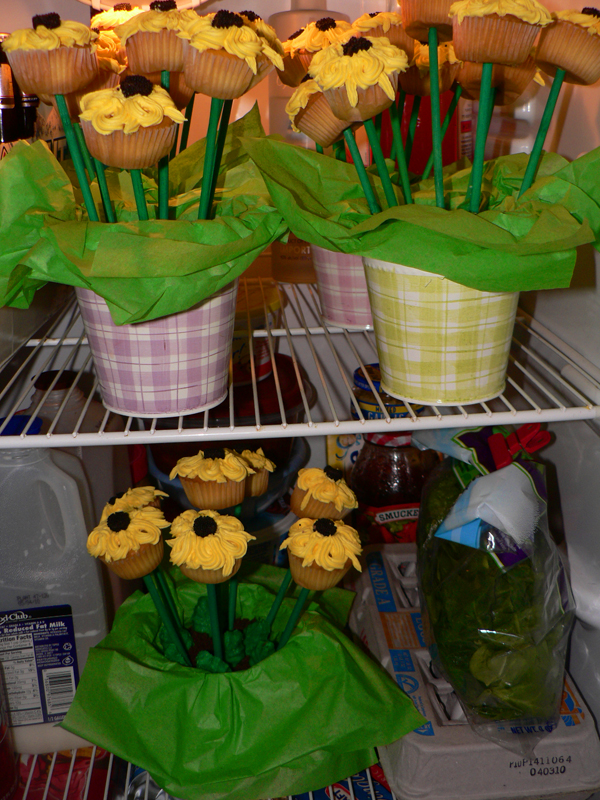
Surely before you started you picked out a cute pot or pail to put your bouquet in (if not you better run to Hobby Lobby real quick lol). 

I got mine at Hobby Lobby on sale (1/2 price .. woot!).  You can use a tin pail, a plastic pail, a terra cotta flower pot .. anything with some weight to it will work. 


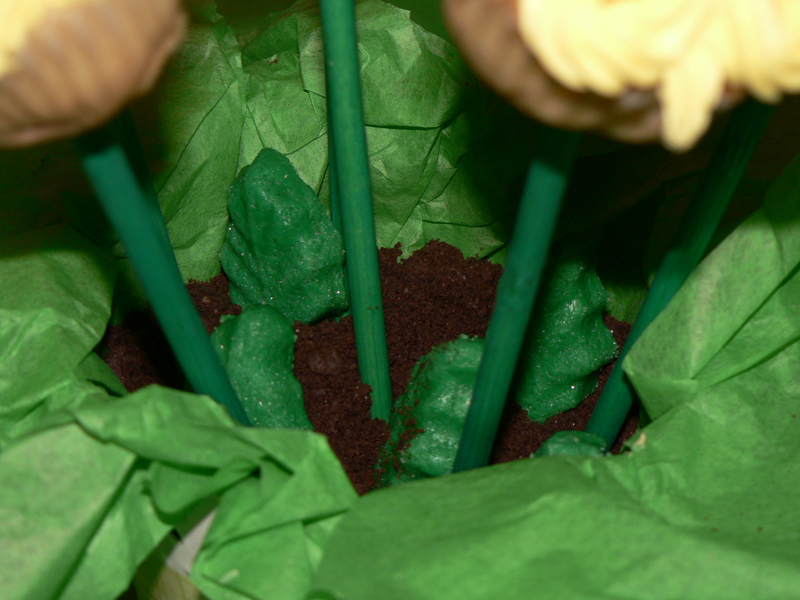
Then you'll want to put some florist foam into the bottom.


Next you'll want to cut up a piece of tissue paper (I thought green was cute .. any color would work though).  I cut a sheet in half, then cut it in half again.  You put the 2 pieces together and stuff them into the pot (on top of the foam).

Now you're ready to add your "dirt", stems, & leaves.  I used green florist sticks for the stems (since I couldn't get my hands on any green licorice sticks).


The final Stage is adding the flowers.  This part can be a little tricky & requires a little patience. 

I sat mine down on top of a sharp knife first, then used a pair of scissors to make a small hole in the bottom of the baking cup, then I just slid the cupcake halfway down onto the stick. 

Note: going further than 1/2 way can lead to a stick popping through the top of your flower!


I made mine the day before I needed them, and refrigerated them overnight. 

Suprisingly enough, even being in the fridge without a cover, they were still moist and delicious the next day.  I was really afraid they were going to be dried out, but they weren't at all!

I will say this, I had to drive from Cullman to Jasper with 5 of these little lovelies in my lap.  I don't think they would have survived if they hadn't been refrigerated 1st. 


All in all I had 4 casualties on the drive over (most were because I went to deep into the cupcake .. some were due to me hitting bumps lol) I think there would have been more had the cup cakes not been cold to start with.

They were completed thawed out by the time we arrived though .. and everyone loved them!  I thought the other patrons at the restaurant were going to tackle me a few times .. everyone wanted to see them lol


Thursday, May 6, 2010

2010 Decorator's Showhouse

The 2010 Decorator’s Showhouse may have already come and gone (April 17 – May 2, 2010), but the memories earned there will never be forgotten. We had a great group of girls this year .. we had some tough times and some mishaps .. but all in all it was a lot of fun and I enjoyed working with them all!
(front row, L2R) Stefanie Russell, Karen Beck(http://salvageinthecity.blogspot.com/) , Alicia Hughes
(back row, L2R) Randi Kierce, Rachael Eden (http://urbanedenal.blogspot.com/), Jennie Lowery, Leigh Upton-Carmichael

For the last 30 years Southern Institute School of Interior Design @ Virginia college has decorated a room during the Decorator’s Showhouse; thus giving a lucky group of Interior Design students the opportunity to let their creativity shine. This year I happened to be one of those lucky few, and this year was no different.

The house for 2010 might have come with a bit of stigma to it (ala Richard Scrushy), but none of the designers let that stop them from turning it into an absolute masterpiece. From beautiful draperies, to 200 year old clock faces .. the house was full of wonder around every corner (or should I say up & down every staircase lol).


12 lucky, fabulous finds were picked out of thousands, from all over the Showhouse (18,000 sq ft to be exact), and found their way into a Birmingham News article entitled the “Top 12 Don’t Miss Items When Visiting the 2010 Decorator’s Showhouse”. One of our rooms (the Ready Suite) actually happened to contain #9 on that list!

http://blog.al.com/living-news/2010/04/richard_scrushys_old_home_is_n.html


A 3pc storage bench that I designed in 3d AutoCAD, and had my Daddy build for me (Happy Birthday to my Daddy btw, today is his Birthday!).

Needlesss to say, I was rather excited (and my Dad seemed a little embarrassed lol) to see something I designed come to fruition .. and get noticed for it, among so many other awesome items!

But enough about me .. let’s talk about our room(s)! All in all we did 4 rooms. We had a Powder Room that was situated (rather oddly I might add) underneath a staircase (one of like 10, no .. I’m not kidding there really were 10 lol), and a Ready Suite consisting of 3 rooms (a locker room, a bathroom, and a playroom, which we turned into a sitting room).

Let’s start with the Powder Room.

It was just plain AWFUL. Well, more like the fixtures in the room were awful. Inside was a toilet anyone’s Great Grand-Mother would die for (complete with pink flowers, ivey, and bone china coloring) .. complete with the matching pedestal sink!


There was also a HUGE, gaudy, heavily ornate, brass mirror that was flanked by a pair of, just as gaudy, (differently colored) brass sconces. What made this room even better was the pink marble, tile flooring and the super contemporary wallpaper (which we actually loved believe it or not).  The room was a complete mismatch!

Since we actually liked the wallpaper, and since it was so contemporary, we decided to keep with that and designed our space to be sleek & modern. We ended up having the floating vanity made for us; because the one we originally wanted was way out of our budget. To be honest, I like the one we had made better than the one we originally wanted .. because it fit OUR space the way WE wanted it to fit.


The vanity really got its “look” from the sink & faucet; that was donated to us by our friends at V & W Plumbing Supply in Birmingham, AL. Without that sink and faucet .. I really just don’t think it would have looked nearly as nice as it turned out. We’ll be forever grateful to V & W!


 We also replaced that rediculous toilet with a new one (A Kohler slim-line, dual flush model, the Persuade). That slim-line toilet really helped the room feel more spacious; since it wasn’t filled up with a big ole, honkin, ugly toilet anymore lol.


The Ready Suite was a really big challenge for us.
The suite itself might not seem very large in person, but having to do 3 completely different type rooms (plus the Powder Room across the hall) was pretty tough! Especially since we didn’t have all that long to work on the spaces or a huge budget ($2500 for 4 rooms!).

The room was really in disrepair, so having to repair things took up a lot of our time in the beginning.

From the circus print tack board (that was firmly mounted to the wall) to the dirty, electric green, red, yellow, & blue VCT flooring .. we had our work cut out for us.

The closet looked like a homeless person had been living in it. I was really shocked at how dirty & nasty it was.

The shelf (which was padded) on the wall was hiding a big surprise .. a huge hole in the wall (big kudos to Rachael for patching that!) plus .. 2 outlets that were situated halfway up the wall .. YIKES! 


There were also some of the ugliest, laminate, chipped (here we see the only time I bet Rachael didn’t like something that was “chippy”) falling apart, lockers in the “mud room”.

On the ceiling were these red, stained glass (what we lovingly started referring to as the candy bowls) light fixtures, and who could forget all the anodized gold fixtures everywhere (door pulls , faucets, shower doors .. ugh).

Some of my favorite items included the 1906 window chalkboard Rachael & I made (I say "I"; because I had to remake it while she was out of town lol).


I also loved the super- cute dog bed (thanks again Kim for the pillow!).

The idea to put to the birds nest inside the side table (thanks to our instructor, Perry Umphrey, was probably the thing I heard most people comment on, as they passed through our spaces on the tour.


And I thought Karen did an awesome job recovering the padded (once circus print engulfed) snap-board.  


All-in-all, I think all the unique things we had all over our space really paid off.

   
Throughout our Decorator Showhouse experience we encountered several hurdles.

The first big road bump was when our tile people backed out on us (holy moley, are you serious batman); so we had to regroup, reorganize, and rethink our design.

Then we had a light fixture shipped 13 states over & get lost in transition somewhere; so we had to figure out what to do about that the week before Showhouse opened.

We may have had a bumpy road, on our way to Showhouseville, but in the end we managed to pull it off (right in the nick of time, literally ... the day before Showhouse opened lol).

Showhouse was a lot of work, and even though I might have moaned and groaned and lost a lot of hours of work (and sleep) because of it .. I really did enjoy every minute of it (except for maybe when people asked me 42 bah-gillion times how many bathrooms were in the house, or said, “aww look it’s the dog’s room” .. ugh lol).